
 |
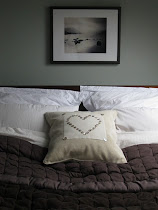
| Button heart panel |
Today is day 2 of the tutorial for the Piped Heart Button Cushion. I'm so enjoying showing you how to make this cushion.
Are you up to scratch with your cushion-making?! Did yesterday's post encourage you to edge nearer to your sewing-machine? Do let me know if you did. Or, for that matter, if it didn't. No lurking, remember?!!
Now, Modern Country Stylers, onto the back of the cushion. There are various different kinds of ways to seal in the cushion inner. In case you hadn't noticed, I'm a sucker for mother-of-pearl buttons so I've used an envelope backing buttoned up with three of these beauties (plus, shhh, don't tell anyone, but I haven't got to grips with zips yet)..
This is what to do....
Step 1

Remember the old sofa seat cushion? We need two more pieces from that. Cut out two rectangles from the original cushion seat material.. They both need to be 22''/55cm by 13.5''/33.75cm (this includes seam allowances).
Step 2

Take one of the rectangles and turn up 1'' (or 2.5cm) once and then twice on one of the shorter sides. Pin in place and then sew shut. Do exactly the same with the other rectangle. I've added the extra fold of seam allowance here because this is where the buttons will attach so it needs extra strength.

Step 3

Onto this newly-rolled edge, sew three button holes the size of your buttons. One in the middle and the other two should be 4''/10cm or so in from the edge.
Sew your buttons on at the corresponding places on the other rolled edge and then do them up.
And that, boys and girls, is where I must love you and leave you today. Next stop, piping: the easy way.
{How are you getting on? Have I tempted you into having a go yet?}


9 comments :
You make it look so easy once again!! I can do all the straight lines but after that, I am all thumbs! :) I am going to try though one day!
I would rather just watch what your doing, I'm too tired to get out my sewing machine ;)
~*~*I agree with Tricia! lol..oh and I dont even have a sewing machine..oh bummer!! ;) LOVE your project~You are very talented! Hugs, Rachel~*~*
I can't believe you're leaving us hanging! HA! I want to see how you do your piping....I guess I'll just have to check back. I love what you've done so far! Great tutorial!
Thank you for your sweet comments. We do to love our family nights. I kind of like your idea where you take turns picking dinner that night. We haven't added that part in, but it sounds like my kids would love being able to have that control over dinner :> Thanks for the idea.
I think sewing has got a name for itself as being hard and complicated but that's only because we're not taught how to properly any more. It's *not* hard, honestly.
That's why I've tried to break the tutorial down into baby steps.
And then you get this wonderful things you've made at the end.
I recently revamped my blog and I guess I forgot to add the follower button back onto my page. Thanks for letting me know it wasn't there. It is now in the right hand column under my labels and "search this blog" area. Hoped that helps and I am glad you want to follow:> Have a wonderful weekend:>
Beautiful pillow and I share your love for mother of pearl.
Thanks for sharing
Helen Tilston
Yes, I looooovvvvvve mother of pearl buttons. I'm wondering how many more I can get away with around the house before Mr Modern Country puts his foot down!!
Post a Comment