

It all started when I was putting away some too-small clothes of my son's. The colour of his old school trousers caught my eye. A gentle charcoal cotton and still in great condition by some miracle. Why had I overlooked them all these years as a gorgeous grey goldmine?!

I began to keep my eye out for something to make with them.
The second ingredient was a pack of three tea towels that I bought from Dibor. Two were red and one was white.
White? For a kitchen tea towel? What were they thinking? It'd get dirty faster than you can say, "Wipe your hands on that...."

But as a panel in a cushion: perfection. The panel suited the trouser idea too because, though long, the material needed wouldn't be terribly wide.
You want to see how I did it? Come with me, my friend......

Unpick the trousers.
You may need two pairs depending how tiddly your children are.
Cut out six pieces on the grain (i.e. in the direction that the threads lie - otherwise it'll fray all over the shop). These pieces should measure:
21" x 4.5", 21" x 4.5", 8 x 4.5", 8 x 4.5", 21" x 12.5" and 21" x 10.5".
These are your best friends for cutting material straight.

Now take your tea towel and cut a 14" x 8" section including the main pattern, if applicable. This will be your central panel.

Press all pieces.
Take the tea towel section and lay its shorter edge along the longer edge of one of the 8" x 4.5" strips of grey fabric, right sides facing.
Pin and sew together 1/2" from the edge.

Repeat on other side of tea towel with second short grey strip.

Now lay the long edge of this pieced-together rectangle along the long edge of one of the 21" x 4.5" strips, right sides facing. Pin and sew 1/2" from the edge.


Repeat on the other side with the second long strip.
Zig-zag stitch along the inner edges of the panel to prevent fraying.

That's the front completed.
Nearly there.

And for the back?
Take each back section and fold in the long edge by 1" and then again by 1" to enclose the raw edge. Pin and sew in place, close to the inner edge.

Press all pieces thoroughly.
Place the cushion right side up and lay the smaller back piece on top, right sides together, matching its long edge with the bottom edge of the cushion front. Pin and sew along three sides, not including your hemmed side.


Repeat with the top piece of the back. There will be an overlap of 3" of the top and bottom pieces.
That's so that the cushion doesn't gape at the back.

Snip away corners.
Otherwise the cushion inner can't squeeze in as well.

Zig-zag stitch round the seam, cutting away excess material.

Turn the cushion the right way round.
Gasp at your awesome sewing skills!
Press again.
I know the pressing is boring but it'll give you a MUUUUUUCH better finish.

I decided to go for a button enclosure but left adding it until this point to ensure everything was correctly lined up.
I sewed button holes spaced 2" apart on the double-folded section of the top back-piece.

Then I sewed corresponding buttons onto the bottom piece.

Add the cushion-inner, button up, and, Bob's your uncle, your very own panelled cushion.
The fiddly part for this cushion was working out the measurements but, once that was done, the actually sewing was easy. I've done the working out for you so now all you have to do is keep your eyes peeled for a tea-towel!
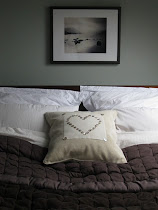
Next time, I'll show you the snuggly home I've given this new cushion. Here's a sneak peek...

I'm linking up with the lovely parties on my sidebar...Come and join me!


49 comments :
Lovely and I have decided that grey is one of my new favorite colors. ♥O
oh my I luv this, my mom has tons of those embroidery that has not been done yet, I was thinking of using paint instead of stitching, this will be awesome.
I am inviting you to share your talent at our blow out linking party.
http://www.passionatelyartistic.com/2010/11/fall-grace-and-blowout-linky-party.html
Thank you,
Maggie
Sarah, it not only is pretty, but it's a sweet reminder of your son. It goes so well too with your decor. I love the sweet stitched heart in the center. And such a fantastic idea.
Great tutorial! I like how you think outside of the box. Nice way to repurpose the trousers. Grey and red were meant for each other. This has a Scandinavian feel to it.
Sew talented...another winner!!!
Lovely cushion. I love that you used your sons trousers! My next purchase is going to be a sewing machine, one day I will be as crafty as you!
It turned out so well! I'm always eyeing up tea towels and wondering what I could do with them. It seems like such a waste to just get them all dirty in the kitchen.
Love it Sarah!! Wish I had your sewing talent! ;)Hugs, Rachel
Beautiful! I love it! Thanks so much for linking up to the Passionately Artistic blog! I loved visiting your site! :)
Court
I've said it before (I think) and I'll say it again, you're a genius!
That is genius!! Love the repurposing done here, wish I were that handy, guess I'll just have to live vicariously through you and others:)
Very cute! I wonder what is in my boy's closet that I could swipe.
What a wonderful idea. The two fabrics look lovely together. I admire your sewing skills...you did just a great job!!
XO,
Jane
I just adore your pillows and you are so creative with them!! I never would have thought to so that with trousers! Wonderful!!!!
Tis gorgeous! A fab use for old school trousers. What a nice pleasant grey! Clever you!
What a fantastic job you did on the pillow! You are so creative.
Kathy
What a great idea! I'm passing this on to my more crafty daughter!
I love the style and resourcefulness of this project. What a chic looking pillow you have now...grey is gorgeous!
How absolutely adorable is that!!?? You are one talented and creative lady and I cannot believe that I donated my son's pair of charcoal grey pants last year! Oh the possibilities I missed out on! I have yet to attempt buttons on pillows. They scare me a bit. Maybe you could do a button tutorial sometime! :-)
Vanessa
Oh I love this cushion! You are so smart! Wish I could sew I would do this!!! Thanks for linking to the Passionately Artistic blog!!!
You are so clever Sarah! This is a fantastic project. Looks beautiful and I love the recycling aspect. Excellent! xox
You're so talented! That turned out beautiful, and what a nice way to reuse things you already had :)
Great idea and I love the idea of reusing the grey cotton trousers.
Just more reasons why to spring clean the closets and find great fabrics.
Wow, that is so pretty! I can't believe how creative you are. Love it!
P.S. Thanks for stopping by my blog. Your comment was uber sweet.
Lauren
http://31diy.blogspot.com
Hi there, I'm going to go out some time today to the log cabin where I painted my desk and see what paint colour I used. I can't remember right now. Oh,and I've added a link to your blog on my blog now :-)Hope you don't mind!
wow, love it! so creative! liz @ designing domesticity
What a great idea! I love the fact that you actually used your school trousers :) I turned out lovely!
Hugs, Nina
Hello,
this is my first time here, and I enjoyed my visit! Thanks for sharing this beautiful project with us! Love the color combination!
Monica.
Good idea to use those lovely grey slacks for a pillow! I learned a lot about sewing just from reading your step by step tutorial. I would have never thought to snip the corners!
Thanks for sharing, I found your link at Jami's Air your Laundry Party.
Just stopping back by to say thanks for joining the party this week! :-)
Have a great weekend!
Vanessa
Oh, this is lovely. I love the gray, the upcycling, and the embroidery with RED. So well done.
...such a smarty pants!
Hi Sarah! I saw your school "pants" and tea towel over at The Shabby Nest ;)
I love the look of the gray pants. thanks for linking to Fantabulous Friday!
Love seeing the tutorial on this pillow! It is so darling with the mix of fabrics and of course the white with red! Love it!! Thanks so much for sharing at Feathered Nest Friday! Off to check out your kitchen post!! :)
this is gorgeous, great job! i look forward to following your blog :)
regrads
Romana
Nicely done ... and sweet memories of your son's school days! I've set aside a pair of pants and a couple of blouses for "someday" projects. I should probably go pull them out and see what I can do with them. Thanks for the inspiration!
Brilliant tutorial. Thanks for posting, I do sew myself but there are so many out there who don't and your post may encourage the timid to sew and create on their own..What a proud accomplishment.
Holy cats! Love this!
m ^..^
Sarah!! This is GORGEOUS!! Get out of here...a t-towel and school pants!! That is amazing! I wish we had t-towels like that here!! LOVE THIS:) ~ xx
Absolutely adorable. I'm blown away by your resourcefulness! And jealous of the sewing...what i could do...lol. THanks so much for linking up! -shaunna :)
This is wonderful! I never would have guessed you used pants for the pillow! Such a beautiful creation. Thanks for sharing!
now THIS is recycling! LOVE the finished product! -diane
Saw your post on Polly Want a Crafter! Great idea :) I am now a new follower.
www.theelephantstrunk42.blogspot.com
It's nice - interesting choice :)
What a great idea, and it turned out so cute! I love the colors too! Thanks for linking up for Friday Favorites! I'm featuring you this week! Come by and grab my featured button if you'd like one.
I'm just lovin' on all of your pillows, Sarah! Beautiful. Thanks for linking up to air your laundry Friday, sweet friend.
Hugs,
Jami
This is so so cute! You are one creative and talented lady! Found you via Swoon Worthy and been all over your blog - just LOVE all your inspiration and wit! It's so great to find such a fabulous UK blog!
Meera xx
I loved my school uniform very much and always remember my school years with warmth. But I faced with difficulties in my studies in the university. That’s why I turned to ghost writer services to keep up with my subjects. I think there is nothing wrong with that. Thanks to this I combined study, work and sports.
And I didn't really like to wear a school uniform. That's why I liked studying at the university so much because I could dress how I wanted. But there were also disadvantages. The load of tasks shocked me. But thanks to the argumentative essay writer I managed to do everything in all subjects. And writing essays or coursework did not lead me to panic.
Post a Comment