Thursday 30 September 2010

Tutorial: Vintage-Style Button Heart Piped Cushion part 1


 Ever have a Eureka moment? It struck me that, with a bit of rejigging, I could use our old sofa seat cushions to make this really fab Modern Country button heart cushion for next to nothing.

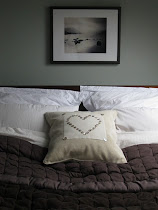
Inspiration cushion - no longer available

Wanna see how? Come with me....

This is what you'll need:

Sofa seat cushion
Calico panel
Buttons
Sewing equipment


Step 1:


Unpick the seams of seat cushion. Keep the piping, and the square top and bottom. Discard the strip with the zip that wrapped around the middle.


Step 2:


Take one of the large squares of fabric and cut out a 20''/50cm-sided square size plus 1''//2.5 cm  seam allowance all round. Put to one side.


When cutting out material, these are your best friends: a rotary cutter, a cutting mat and a clear rule. You'll get much better straighter and cleaner cutting than with scissors.


Step 3:


Take a piece of calico (I used an old cream curtain lining), iron it and put it in an embroidery ring. This will help get the buttons spaced evenly as it pulls the material taut.


Step 4:


 Sew on mother-of-pearl buttons in a heart shape. I found it easiest to put a pencil dot at the top, bottom and widest point of the sides of where I wanted the heart to go. I started at the bottom and worked my way up.


 Step 5:

Take the calico out of the embroidery ring and cut it to a 10''/25cm square plus 0.5''/1cm seam allowance. Turn under and pin the seam allowance. Press flat. Please don't skip the pressing steps when you make something. It's simply miraculous the great results it gives. 
  

Step 6:


Attach the calico panel in the centre of the larger square you put aside earlier using small discreet stitches called, I think, hem stitch.


Step 7:

Sew larger mother-of-pearl buttons to the corner of the calico sqaure.


I hope you've got your scissors to the ready. I'll stop there for now to let you catch up. Come back tomorrow for the assembling of the cushion.

{So....what do you think so far? Do you think you might you have a go? }

Enter your email address:

to subscribe to Modern Country Style


Wednesday 29 September 2010

Modern Country Style loves: Emerald Cove

Thank you so very much for all the lovely de-lurking comments that you wrote yesterday. It was hugely encouraging!


I thought I'd do a little spotlight on my top commenter today (see my Modern Style Top Commenter gadget on the sidebar....are you listed  there yet?).

The number one spot goes to........................Michelle from Emerald Cove. I've been a Follower of Michelle's blog for a couple of months and it's lovely!


Three things I LOVE about her blog:

It's chatty. Michelle has got the kind of writing style that makes reading it a mixture of curling up with a good book and chatting with your best friend.

Her ideas are orignal. Check this out.....


Yes, Michelle made that with her bare hands!

Her photos make me laugh. This photo is from the same post:


What a power-tool babe!

Errr....I should add that when I went over to see Emerald Cove to get these photos, I saw that Michelle has givenme an AWARD! Thank you!!

But now it looks like I did this post  because of that award. *awkward silence*.

I really, honestly didn't know when I started this. But that's the kind of lovely award-giving sweet-commenting girl she is!

Enter your email address:

to subscribe to Modern Country Style


Tuesday 28 September 2010

Are you a Lurker or a Commenter?


Hello gorgeous! You're looking especially lovely today, if I may say so. I do hope you haven't gone to too much trouble on my account....:-)

I've put up a special Commenters widget to SPOTLIGHT the best commenters on Modern Country Style. Can you see it? Is your name on the list? If you post enough comments to get you into the top ten, you automatically get a link from Modern Country Style to your site. How cool is that? Was there ever a better incentive?! 

I'm so grateful for the lovely comments Modern Country Style receives. But....I know lots more of you are out there....lurking!


Old Image from Apartment Therapy

Are you a lurker or a commenter? Let me know by clicking on 'Leave a comment' below and then...errrr....leave a comment.....

Oooh, and I have some exciting news! Modern Country Style was featured on Tattertots and Jello! Thank you  to the lovely Jen for picking out our Modern Country Kitchen renovation.

And it was featured on Simply Designing too. Thank you, Ashley, for also choosing our kitchen makeover! 

What's that? You'd like a peek too? As always, your wish is my command: just click on the new photo of our kitchen in the sidebar,  all related posts will pop up like magic and you can browse away till your heart's content.


Well, I've had a lovely day today making cushions. Nothing says 'snuggle up into me' more than a sofa filled with inviting, plumptious cushions. Don't you agree?

 I found these lovely ones on Ebay. Aren't they finished beautifully? I am very keen on beautiful finishes. I've been practising and practising. a lot of practise has been needed for producing any where near a beautiful finish but I think I'm getting there.

Two things make a humungous difference to a good finish. Measuring well initially is the first. Not my forte, I have to say. However, painful and frustrating experience (can you hear my sobs echoing?!) has shown me that it really is worth doing properly.

And the second is: pressing, pressing, pressing. It's quite miraculous  how much of a difference a good ironing session makes to the quality of the finished product.


Anyway, I've been sewing away very industriously and will soon have some, I hope, beautifully finished cushions to show you..

I will report back very soon. 

Now, on to you! I'd love to know what you like and what you'd like to see more of on Modern Country Style. Is it the photos? The tutorials? Our house renovation? I'd love you to let me know....

Enter your email address:

to subscribe to Modern Country Style


Thursday 23 September 2010

Tutorial: Vintage Scrabble magnets...


Welcome to the first official Modern Country Style tutorial!

I love the fashion for all things Scrabulous and thought I'd do my bit for the Scrabble revival cause. Plus, could there be a better opportunity to try out my new glue gun!


Oh yeah, baby. I got myself a new craft toy.
I know I'm about a gazillion years behind everyone else who seem to have had glue guns from birth (and what a great baby shower present that glue gun would be...) but better late than never, right?

This is what to do to make yourself brilliant (and useful...a good combination in my book) Scrabble magnets.


Step 1

Find yourself a Scrabble set.

It's definitely worth sniffing out older versions, because the tiles seem to have so much more character. You could try hunting out older sets in charity shops, car boot sales, yard sales or your parents' games cupboard....


Step 2

Pick out the letters you need.
You could choose random ones for pinning up notes or you could pick out tiles that spell out a message, as I've done. Can you see what it is yet?! (I always knew I was destined to have a Rolf Harris moment.)


Step 3

Get your little button magnets ready- one per Scrabble tile.
(I got mine from ebay.....is there *anything* you can't buy on there?!).
Do check to make sure they're all thoroughly magnetised because occasionally you get a dud that's been knocked about and has lost its magnetism. It is possible to get it back (by stroking it in one direction with another magnet until it's remagnetised) but a whole lot easier to start with good ones....unless magnet-stroking floats your boat, in which case, by all means, be my guest...


Step 4


Attach the magnet to the back of the tile with a glue gun. Check me out with my new craft toy! Meet my new glue gun on its maiden voyage.
Why didn't I get one of these years ago?


Step 5


Press the magnet down onto the Scrabble tiles. Is this necessary with a glue gun? I'm not sure but I did it anyway. Spot the glue gun virgin. *blush*


Step 6


Wait for the glue to set and then put them on the fridge (as I've done)....or radiator.....or anywhere you want that's magnetic.


I'm linking to the weekend parties on my side bar!

Enter your email address:

to subscribe to Modern Country Style


Tuesday 21 September 2010

Kenwood Chef nostalgia.....


When I was a little girl, I can remember standing on a chair next to my mother while she was cooking. She would tell me that her mother had a Kenwood Chef and had bought one for her when she got married, and that when I was a big girl, my mother would buy one for me.


Well, now I am a big girl (!), I do have one of my own. My parents bought one for me (thank you!) when I got married. I felt very grown-up when I unpacked my Kenwood Chef and put it, in pride of place, in my very own kitchen in the first placed we lived.


If I had to rescue one thing out of my whole entire kitchen ('whole entire kitchen'? That makes it sounds as though I have about three acres of kitcheness....! Errrr.....I don't), then it would most certainly be this:


And now, when I'm with my own daughters, I tell them, when we're cooking together, the story of how Grandma's Mummy bought her a Kenwood Chef and my Mummy bought me one and how when they are big girls, I will buy them their very own Kenwood Chef.
And I'm not ashamed to say that it quite often brings a tear to my eye.


Enter your email address:

to subscribe to Modern Country Style


Monday 20 September 2010

Modern Country Kitchen accessories


I'll start off with some Thank Yous, if I may. A rather formal start, I know, but nothing wrong with a bit of formality where formality's due.


First of all, a big thank you to those of you who are taking the time to comment and follow Modern Country Style. I know I always say this but it does mean so much when someone I've never met wants to see what I've been doing and, more to the point, LIKES it and then follows in anticipation of what's coming next!


I'm so happy to see the Followers numbers rising. Thank you especially to the new followers for letting me know that you've followed. It means the whole writing thang takes on new meaning. It's more like writing to friends. Having a good old natter. And there's few things I like more than a good old natter with my pals. Don't you agree? If you do, then please will you Follow too? Just click on that there button to your right.


Thank you very much to Tattertots and Jello for picking out Modern Country Style from the Weekend Wrapup party. I'm over the moon to have my Modern Country Kitchen post up there in BIG. Where else but blogland would you get praise from a (very kind) stranger for how you've painted your kitchen?


And lastly, thank you to Mrs Sutton for tagging me. I will get on with replying...honest!


So now that the formalities are over, let's get back to the kitchen. I said in my last post that I always like to hold back from putting out all the things that complete the room I've done up until the room is One. Hundred. Per. Cent. completed (no cheating, mind...yes, Mrs Modern Country, I'm talking to you.....I am prone to a bit of cheating, it's true).


You might have spotted a few bits and bobs on Friday's kitchen reveal but I wanted to show you close up now we're such firm friends. I've tried to use pops of red throughout the kitchen. I love the combination of the Farrow andBall Blue Grey with red. So Modern Country!!


I hope you've enjoyed this lengthy snoop around my new kitchen. Isn't snooping lovely?! I love a good lazy nose around other people's blogs, don't you?!

Enter your email address:

to subscribe to Modern Country Style


Thursday 16 September 2010

Modern Country Kitchen Reveal

modern country kitchen
Wooooooohoooooooooooooh! I know you're all so excited. Yes, I can hear you chomping at the bit but I'm here to tell you that the kitchen reveal is finally here. I've been literally holding myself back by the reins in order to make myself not spill all the beans on day one. Must. Hold. Back.Must. Hold. Back. Repeat. Ad. Nauseum.

Before I start, please could I ask you something personal? I'm so pleased and happy to have new Followers (thank you, thank you, thank you) but if you join and don't let me know then I don't currently know how to recognise newcomers in the list of Followers. I really want to make you feel welcome and wanted and warm so please, please leave a comment or email me?

So, Modern Country Stylers, we started with this:


What I've been most pleased with is how incredibly different the aspects that we *haven't* changed look. The kitchen units themselves are cream shaker-style and the beech worktops both look better than I could have imagined. The wood had obviously been reflecting the dayglo orange of the walls previously. As soon as we painted, they took on a beautiful mellow hue.


I don't know about you but when I'm doing up a room I make myself hold back all the lovely accessories I've bought until every last drop of paint is rolled on, every last inch of sealant is applied. It's like a carrot of loveliness dangling on a stick for me. Signing to me like a seductive siren, to complete the ruddy room if it's the last thing I do.

Isn't it one of life's fantastic moments when you stand back and survey your hard work coming together. A real 'aaaaaah' *deep breath out*. It means I can get out all the goodies I've been savingup, making a fantastic moment almost deliriously ecstatic, to be quite honest.

But I'm racing ahead of myself again. Soooo much excitment! Hard to contain.


I meant to break down the process and tell you what we've done in the kitchen. So let's just rewind for a moment or two and I can share with you what I've been up to.

Here's the list......


We replaced the dark brown plinths with cream ones to match the units, which really opened everything up.


We moved the boiler up out of the kitchen to the airing cupboard in the bathroom......


....which meant we could add open beech shelving in the newly acquired space.


We removed the blue and orange tiles and added beech backstands around most of the kitchen plus cream tiles behind the sink and cooker.


Here's the before photo again to save you scrolling up and down because if there's one thing I hate it's scrolling up and down in a reveal. I love to check back to see what's been accomplished but too much scrolling and the red mist falls.


We tiled the shabby mdf back doorstep with slate tiles.


We replaced the small wooden door knobs with large wooden doorknobs.


We painted the room with Farrow and Ball Blue Grey and Farrow and Ball White Tie. Oooh, I love me some Farrow and Ball. Yes, siree, I do. The intensity and quality of colour make them the best paints around, in my opinion.


We painted the back door gloss white. to replace varnished orangey wood. Another big change. It's quite dark in this part of the room so this white helps to lighten it all up.


We changed the plugs from standard white to flat steel (the flat-screen tv of the plug world).


And lastly, we replaced the door handles with cast iron black ones.


I'm linking to the weekend parties on my sidebar.

Visit thecsiproject.com

Enter your email address:

to subscribe to Modern Country Style


Related Posts with Thumbnails
 
01 09 10