
Hey honeypops,
You know when you're choosing
fabric for a project
and you end up with a whole pile
of sample pieces?
Do you ever wonder what to do
with all those unwanted
- but still very gorgeous -
bits of material?
I have the perfect plan.....
I present to you:
the easiest patchwork cushion
in the world....ever.
Mmmm, yeah - had my lawyer check it over...
;-)
I had a whole pile of samples
hanging around looking forlorn.
They were crying out to me
to make something pretty with them.
I've prepared a tutorial for you
but I'll add in extra tidbits of usefulness
for those of you who'd love to have a go
but are absolute beginners.
Any questions? Just ask....

{Try and arrange them, as above, in two rows, in the shape that you want your cushion to be. You can choose as many pieces as you want but cut them all to the same height within each row. This will make it sooooooo much easier for you to sew it all together.}

{...and don't worry if your pieces aren't squares
- some of mine were rectangular.
As long as each row is the same height, you're golden.}
As long as each row is the same height, you're golden.}

{The picture above is of the two pieces of fabric sewn together and opened out.}


Just a side note about sewing straight:
There's no big secret to it.
Patience and practise is ALL it takes.


{You don't have to do the zigzagging step
but your cushion will almost certainly last longer if you do.}
So, now you have your patch-worked strips of material,
what to do next.....?


See what I'm doing here? Having sewed the patches together to make strips,
I'm now joining those strips using one long, straight line of stitching,
which avoids have to sew each fiddly piece one at a time.
I'm now joining those strips using one long, straight line of stitching,
which avoids have to sew each fiddly piece one at a time.

{For a more detailed tutorial of
how to make button-closure for a cushion,
click here.}
It's ALWAYS a good idea to press your work as you go along.
It creates a MUCH more professional look
AND makes the material easier to work with.
how to make button-closure for a cushion,
click here.}
It's ALWAYS a good idea to press your work as you go along.
It creates a MUCH more professional look
AND makes the material easier to work with.

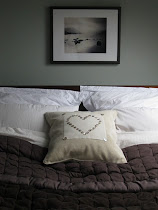
And that's it!!
Want to see what I made?
Tomorrow, I'll be sharing my version!!


25 comments :
Very nice colours!
I'll be back tommorow.
Greetings from the Netherlands,
MGB
Love the red. I cannot sew (sadly)....That's why I appreciate these posts!
As a non-sewer I feel convinced that even I might be able to manage this - and want to manage this.
Great tutorial Sarah.
Anna
I really need to do this...but I have such a long to do list. Oh well, I'll stick it at the bottom of the list and I shall get to it someday.
Love that Cabbages and Roses/Kate Forman print. Love it!
xxx
Hi there!
the fabrics you used are so pretty! Thanks for sharing this cushion tutorial!
best wishes,
Duni
Oh, You.. fabulous, you! Sarah!
I love, love your crafts! You're so talented. This is so pretty. I'll be back to see the rest!
Have a great day!
xo
Luciane at HomeBunch.com
Now this I can do, I CAN sew, not much else but I can sew. I have a couple of fabric sample books upstairs given to me by a local lady who makes curtains. This idea is just the ticket. I do love the samples you have chosen and I look forward to the viewing tomorrow.
EVERYONE can sew! Really!! There's no special secret to it - it's just making yourself start, and choosing gorgeous but easy projects at the start!
You'll be SOOOOOOOOOO proud of yourself!
In fact, I feel a craft party coming on....
Sarahx
Oooh you're brave. I REALLY wanto learn how to sew. I've asked my husband for a sewing machinet his christmas... I'm not going to lie though, they terrify me! They go so fast!
Looking forward to seeing the finished project. And thanks for the reminder about pressing everything when sewing.... I can get a bit lazy about this step and you're right, it makes a better finished project if you take the time to do it right!
~Chris
Clever kins! This is great since the samples are free AND in the same tonal value.
Well, I can tell that this project is going to turn out mighty cute. I can't wait to see it all done. Love your fabric selections...red is one of my favorite accent colors :)
Love the fabric - I adore red and white. I made a simple bed quilt with large squares in a similar way. Looking forward to seeing the result!
Thanks for your lovely comment about my Ma. We weren't blessed with the money gene in my family but I think we got the young gene :-)
i wish i could sew! it's on my someday list. i absolutely adore the mix of fabrics you put together here.
michele
Delicious tutorial, Sarah! Well done. I even like the font on your photos. :)
Can't wait to see what you've done! I might try the cushion... in a few weeks. My mother taught me how to use her old sewing machine during the summer... But I need some practice before I can sew straight... Right now it looks like I had an Irish coffee before sewing!
Sarah, what I like about this tutorial is that it is brilliant. Just brilliant. It explains everything about patchworking (is there such a word as "patchworking"?) so well that even a dimwit like myself could rustle up some sort of patchwork concoction. I shall definitely be bookmarking this. Oh yes, I will. Can't wait to see the finished cushion. xx
What a tease, Sarah! Can't wait to see the finished article! The fabrics are gorgeous.... and it's so neat! Looking forward to tomorrow's reveal. Babsxx
Great idea...I'm looking forward o seeing yours, I use my fabric samples as napkins. Some companies, like Robert Allen, are very generous with samples and they are perfect for dinner napkins!
Stacy
Thanks so much for the awesome tutorial! I know it's kinda hard to do these tutorials, so it's super generous of you to take the time to teach all of us!
You tease!! Can't wait for the next photos :) XOL
Oh, you keep us in suspense not showing us the end result!
I've done a bit of patchwork quilting before but haven't finished it and now I can't find it ANYWHERE - pants!
Thanks to this post I shall have to have another rummage at some point...
I really should make some of these and get through my bits of fabric too - my studio would thank me!
Mmm...I would love to get my hands on to that flower print. You did such a nice job with your tutorial!
Oooh this is lovely! I do love to sew although I'm a completely and utter novice but there's something terribly therapeutic about it...
Fab idea using samples though, will definitely have to try this!
xxx
Post a Comment